
What We've Tried
Over the years, we have tried many ways to keep track of assignments. In the early days (and on and off since then), we have used the old fashion paper and pencil trackers/lesson plan sheets. I've made a daily planner on a whiteboard. I've tried Trello boards, I've tried a commercial online planner. As most homeschoolers, probably, I've tried many things.Our latest method is using Google Spreadsheets. We've been using it this past school year, and I have to say, although it's far from perfect, it's working great for us now and seems to currently be the most efficient way for the kids to keep track of their work and to keep me informed of their progress at any time.

Access Your Planner From Anywhere
One beauty of Google Spreadsheets is that it is online, so I can access it from my desktop, my phone, or a laptop. When I was nursing the baby, I could quickly check on my phone to see if the kids had completed their work for the day as assigned on the spreadsheet planner. It is also great to have it online so that I can make changes more easily than on paper.A Look At One of Our Planners
To give you an idea of how you can use the spreadsheet for daily homeschool tracking, I will go through one of our planners and show you the different things that I have included, in shaa Allah. Using Google Spreadsheets works best if each child has access to their own phone or computer (or don't have to share with several kids, it's not idea for many kids sharing on one computer).My Headings
Of course, the headings will vary based upon the courses and projects that each student has. The ones that stay the same tend to be:
- Notes
- Days Left
- Date
- Day of the Week
In the notes column, (as seen below) I mark off any school holidays and breaks, as well as any tests the kids have to take, for example. In the picture below, you can see that my high schoolers had to take the CAHSEE exit exam, and then it shows our spring break in purple.

-Days Left Column
In the second column below, I have the days left of the school year. I usually only put this in towards the end of the school year. You could also use this to denote number of days left in a particular grading period (quarter, semester). To put this in, I started at the day before the last day, and numbered up from the bottom, 1, 2, 3 going vertically up, then I highlighted these three boxes and dragged up so that it filled all the way up. (This pic was taken before formatting..I later centered the column...)
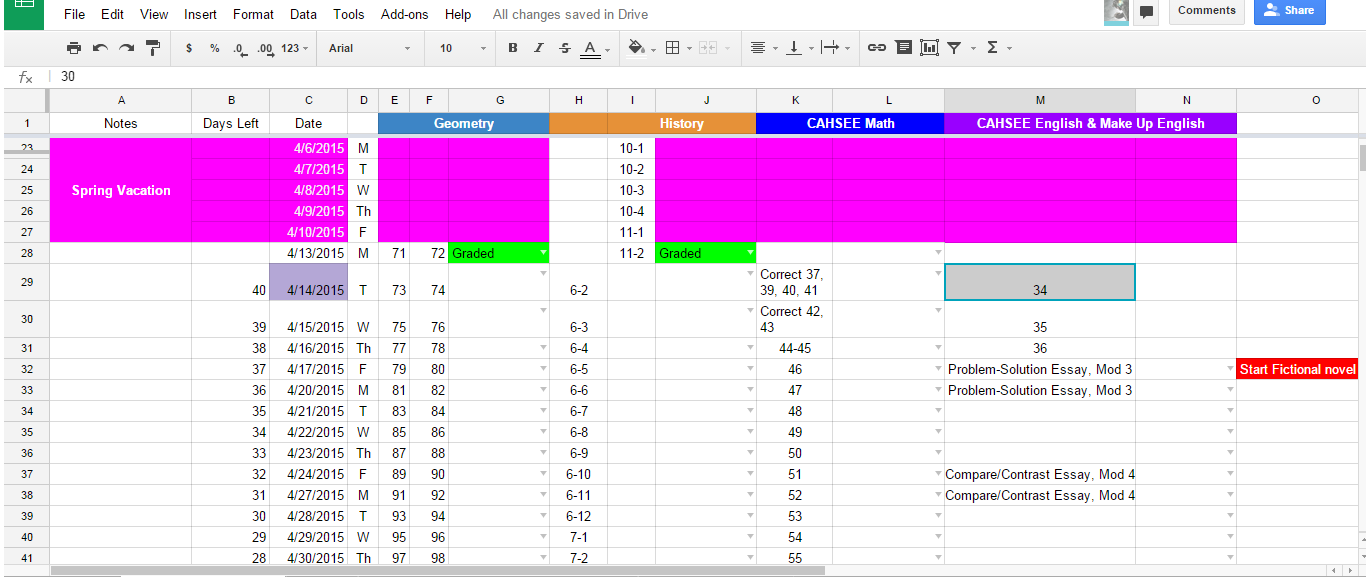
-Date Column
The third column is the date. On this particular schedule I didn't put in the weekends so it took a little finagling to fill down on this. (I had to use formulas to add 1 to the previous day and when I got down to Monday of the next week, I added 3). Once I established a pattern, I was able to fill down. But, if you are not familiar with spreadsheets, you can simply keep the weekends in and once you put in the first date, you can highlight that cell, and drag it down as far as you need to to automatically put the dates in. It's also great to keep the weekends though, in case work was not completed during the week, then you can add it in. I forgot why I decided to omit them........
Tip: Help Kids Quickly Locate Today's Work
Here are a few tricks to help the kids quickly find today's work. As you can see above, today is the 14 of April and it is purple. And tomorrow the current date will be purple. To do this, you can use Conditional Formatting ((see right side of the picture below for the popup where you set the conditional formatting)
Go to the Format menu >> Conditional Formatting >> Add New Rule >>Apply to your range ( highlight your column/cells or type in the range) >> Format cells if (choose Date is, then Today--see second picture below)) >> Formatting Style (choose the text and/or background colors that will display when it is today) >> Done.


Another way to make it easier to identify today's date is to hide rows above it (I don't do this often, just when they get further down the spreadsheet.) To do this, highlight the rows you want to hide, right click and choose "hide rows...." You can also delete these rows, but I like to keep them in case we realize later that we needed them.
Tip: Freezing the Headings
As you get down further in your spreadsheet, it is a great idea to freeze the top headings. To do this, highlight your heading row, choose View >> Freeze >> select from the options given
-Day of the Week Column
The fourth column, as you can see above (or below), is the day of the week.
Tracking Progress in Each Class
The next columns, for each class are where we track daily progress. Each class has it own set of columns. I color coded each class so each of the subcolumns for a particular subject is more easily identified...So, looking at history, for example, the first column tells my kids the assignment. The homeschool program we use has a syllabus, but the lessons are not numbered, so I numbered the lessons with a unit number, then a hyphen, then a lesson number. The kids have to turn in work by units, so this helps us keep track of the units. If you are homeschooling independently, it's a great idea to prepare a master list of your lessons (with page numbers, exercise #s, etc) for the year or quarter (and give your child a copy to keep in a binder/notebook) and then use some type of numbering system so that you just need to use that number on your spreadsheet instead of writing page numbers or directions out.
In history's second column, this is where we track. I took advantage of a feature called validation so that I could use a drop down menu for us to mark progress, as you can see in the history column above.
When the work is finished by my student, he/she clicks the cell next to that assignment they have finished and they select "finished." ( When I look at the spreadsheet and see "finished, " then I know that I have work to grade. When I have graded it, I click on the dropdown and select "graded" if there are no corrections to be made. If there are, then I choose "Need2Correct." If I can't find the assignment in their online storage folder or in their physical folder, I choose "missing." These are my own descriptors, you can make ones that fit your needs. You can also see, that besides customizing what is said, I have also formatted to make each choice be a different color when selected to call attention to it. Need to correct is red, graded is green, etc. I explain all this next.....
How to Format These Progress Cells (What's in them and how they look)
First, what goes in your cells:
First you highlight the column cells where you want the formatting to occur. Then, choose Data (on the menu) >>Validation (a box pops up) >> Criteria >>Now select List of items and type in your list (as shown below with the commas)) >>Save

Now format what the cells look like when you choose the different items in the list
Go to Format (in the top menu) >> Conditional Formatting>> then under Format Cells if... (choose "text contains" or "text is exactly" (see picture below)) I usually just choose "text contains" I think.

Once you choose "text contains" or "text is exactly" another box pops up:

Now, once you have this validation and formatting established for one column, you can simply copy and paste these cells that you've formatted to another subject's progress column and the formatting should be copied. (You should see the dropdown arrows if it copied correctly).
Copying Your Spreadsheet to All Kids
As I said earlier, Google Spreadsheets works best if each child who is using it has access to their own phone or computer easily or at least doesn't have to share with everyone. It is not as great to use (but still doable) if you have to share one computer, for example. I've found that it is best to make up a master spreadsheet with all your formatting as a template and then copy that template to a spreadsheet/book for each child.
As you can kind of see below (smile), right click on the arrow to the right of the spreadsheet name and a box pops up. Choose "Copy to" and a box pops up which will let you choose a folder (if you have folders) and then a specific child's spreadsheet book (each of my kids has their own spreadsheet book for lesson planning.

Some Limitations
So, that's basically how I set up planners for each of my kids. We've been using this for this past year and it's really working great. As I said, Google Spreadsheets is not perfect and I've found a few caveats. For example, if you are used to using Excel, as far as I know with Google Spreadsheets, you can't delete individual cells, only whole rows. That can be a pain, and I often times have to move a whole column up some rows by cutting the contents and pasting them up, whereas with Excel, I could just delete a cell and the contents below would be moved up. But, it still is easier for me to edit a Google spreadsheet than say, editing on paper because I have to erase and rewrite.If you are not especially computer savvy, using spreadsheets may seem like more work than you are to get into. I've tried a trial version of Homeschool Planet and although I absolutely loved it, I found that the kids weren't really using it (maybe I didn't give it enough time, but since I only had a trial version, I wanted to see if something else would work before I committed to purchasing it and Google Spreadsheets seemed to fit the bill at the time). I did like that with Homeschool Planet, it was easy to reschedule assignments that weren't complete. With Google Spreadsheets, you have to manually shift things as I mentioned before (selecting cells and moving them down which can be cumbersome if you've planned for a whole year, for example). But, we just didn't get up and running quckly with Homeschool Planet, so I am glad we just used the free trial as I was very close to purchasing it. If the thought of setting up your own spreadsheet seems ugly and painstaking to you, and yet paper is still inefficient, then I would definitely recommend Homeschool Planet for scheduling, because it was pretty neat and I have read about several people who have had great success with it.
Do you use Google Spreadsheets as a homeschool planner? If so, can you offer more tips?
If not, what method of planning do you use, paper? digital? white board? Something else? Please share in the comments to help others.
**This post contains affiliate links for Homeschool Buyers' Co-op which produces Homeschool Planet. If are unfamiliar with affiliate links, it means that if you click on the link and purchase a subscription for Homeschool Planet, I received compensation. This does not affect your purchase price.**


