
Feel like you're wandering around aimlessly in your homeschool because you don't have a solid plan? Take the time to plan out your year for better results, in shaa Allah.

When I first started homeschooling, I found that I was planning mostly week by week (sometimes day by day). As the years went on, I discovered that it was more efficient to try to plan out the whole school year before actually starting school work. Sometimes that can take a lot of work, but I’ve found that it is truly worth it in the long run.
This past week I was planning out my 7th grader’s year. We are in an independent study program (iLead Exploration) where I get to choose the books/curriculum so the planning was left entirely up to me. At first, we were just going day by day (with the intention that I would eventually set up a plan), and I would tell her to just do the next section in the book. That became frustrating really quickly as some sections took longer than one class period but I didn't know that because I hadn't taken a look at the lessons in depth. So I knew it was time to sit down and start planning. The next time through, in shaa Allah, I plan to get all the planning out of the way BEFORE we start. (We got a late start this year as our books didn’t come in until 3 weeks or so after school started so I wanted to dive in and get started when we did finally get them.) BIG mistake. Lesson learned: Get that planning out of the way BEFORE you start!
So, as I set out to plan this past week I thought it would be helpful to lay out my latest process for planning. There may be more efficient ways, but it worked really well this go around of planning, so I thought I would share.
So here are the steps (at the end you’ll find planning worksheets to help get through the steps more quickly, in shaa Allah).


At this point, you can go back and determine the number of instructional days needed for the rest of your child's courses and plot them on the weekly schedule as well.
 One thing to make sure is that you try to make the pacing guides consistent from class to class. Some things will obviously look different (some classes may only be T and Th, while others are 5 days a week). When I started planning, that was my intention (uniformity) but the first ones did come out somewhat different and I wish I had kept them more uniform (I do however change my color choices based upon the class. Math is always blue, Science is always green, color is a very big thing for us around here for some reason!).

My daughter is very much enamored with all things British right now, so I tried to incorporate some Britishy clip art to spiff up her schedule.
We already had our times/blocks worked out at this point, so I was able to make the schedule, but if we hadn't our next step would be to:

So that’s how I am currently planning my classes now. Planning is time consuming, for sure, but taking the time to do it in the beginning can really cut down on a lot of frustration later down the road. I also found that my daughter was a little stressed out when we were just winging it daily for the beginning of this year and she said it was so much better now that we had the pacing guides and I could tell in her demeanor as well that she felt more at ease, alhamdulillah. As I've read, kids thrive on routines and knowing what to expect next.
If you need any additional help or clarification on anything, feel free to contact me using the Contact TJ button at the top of any page, or contacting me via Facebook or Twitter!
Happy Planning!
1. Define your school year:

To start, get or make a calendar that spans the whole school year on one page. My favorite place to find free calendar printables is Calendar Labs.
With your calendar:
- Pick beginning and end learning/school dates. For many years I never did this and the year I started doing it, it made such a difference. It didn’t seem like we were just trudging along aimlessly anymore once we had concrete (yet still flexible when necessary) start and end dates.
Some things to consider:
Once you decide, write down your beginning and end dates!
- Will you homeschool year around? (If so, it is still a good idea to pick beginning and end dates).
- Will you homeschool by going x number of weeks with a 1 week break? For example, some homeschoolers homeschool maybe 5 weeks, taking each 6th week off. (or 8 and taking the 9th off, etc) This also worked well for us, the number of weeks on and off sometimes varied from year to year but not within the year (but if it works for you to have varied break lengths throughout the year, do that)
- Will you use a traditional school year?
(You can use my "Homeschool Planning Overview Worksheet" for this.)

- Mark off your holidays/days off. Pretty explanatory. On your calendar, mark off the days, such as holidays, that you will take off. Three of my kids are in public school, so for my homeschoolers, I try to coordinate their breaks with the public schoolers’ as well as take off days for the two Eid and sometimes perhaps yawmul Asharah or yawmul Arafah or the first 10 or so days of dhul hijjah.
- Define your school week. Which days will you have instruction?
- Will you work the traditional M-F work week?
- Will you homeschool 4 days a week? When we lived overseas, we followed the work week where we were and homeschooled Saturday – Thursday.
Once you you’ve decided, record this.
(You can record it on the
(You can record it on the
2. Determine # of Instruction Days

I used to just count up the number of days in the year, but I found a new way that I thought was more effective as far as planning individual classes:
- Whatever days your school week consists of, count off the number of each type of day. For example, we are homeschooling M-F so I counted out the number of Mondays, then the number of Tuesdays, and then Wednesdays, etc. in the year, skipping any holidays that fell on a particular day.
Be sure to write this down as soon as you are finished counting.
(I made the mistake of not doing so a couple of times and had to recount, which is why I made up a Homeschool Planning Overview Worksheet
(I made the mistake of not doing so a couple of times and had to recount, which is why I made up a Homeschool Planning Overview Worksheet
- Now, take a look at different configurations that you could have for classes and add up the number of days, for example:
- 5 days a week: M-F (From the previous step, add together the total number of Mondays, Tuesdays, Wednesdays, Thursdays, and Fridays). Write this down! _________________ These are your number of total instruction days for a five day a week class.
- 4 days: M-Th (Add up your total Mondays, Tuesdays, Wednesdays, Thursdays.) Write this down! _________________
- 3 days: M W F (Add up the total number of Mondays, Wednesdays, and Fridays) Write this down! _________________
- 2 days: MW or T Th (Add up the total number of MW: ______________ and total number of Tuesdays and Thursdays: )Write this down! _________________

These are just examples, you might do other configurations such as MTW, etc, but the ones above seem to be the most common.
3. Plan out the courses

Start with the first class you will be planning and for this class:
- Determine the number of instruction days needed. The easiest way to do this is to look through the table of contents of your book and count the number of sections. This tends to be easier in classes like math and science where the books may be more uniform from lesson to lesson. Even though it can be a headache, for some classes, I usually end up flipping through the book page by page because sometimes sections may vary in length and I may decide that certain lessons need 2 days instead of one. If you are able to, write down in the table of contents how many days each section should take (1 or 2 usually) and then you can go back and tally them up in the end, in shaa Allah.

Write the number of lessons down (or you can use the "Course Planning Worksheet"
- Next, compare the number of instruction days needed to each of the configurations in step 2. (Refer to your results if you filled out the "Homeschool Planning Overview Worksheet" previously. See which configuration comes the closest to the number of instruction days needed for your course. If it is closer to one of them, you can choose this option. Sometimes you may need to tweak the number of instruction days to make it fit by:
- doubling up a few sections on certain days
- using a weekend or vacation day here and there for instruction
- move your year-end date as needed
- Next, based upon the above comparison, create a rough, weekly schedule showing which days of the week you will do the class. You don't have to worry about timing right now, just place the class.

At this point, you can go back and determine the number of instructional days needed for the rest of your child's courses and plot them on the weekly schedule as well.
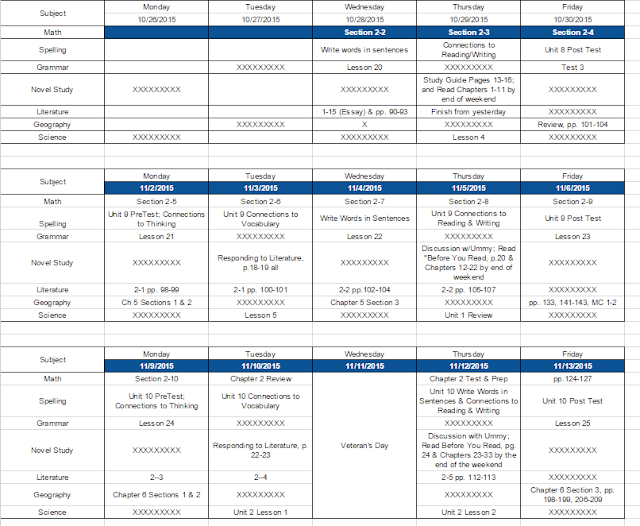
- Next, create a separate master pacing guide for each course. The pacing guide (I prefer table format) shows what should be done on each instruction day.
Below is an example of part of a pacing guide that I made for my 7th grader this past week:

I highly recommend that you make up blank templates for each class configuration (one for M-F, one for MWF classes, and another for T, Th classes) and then just use these for each class as appropriate. When I go back and look at all the pacing guides I made this past week, it is a little unsettling to me that they are not as uniform as they could have been (but that might not be an issue for you). On your template, you may also want to type in all the holidays as well, as several times I forgot to and had to do some cutting and pasting of assignments.
If you're not super computer savvy or you'd like a head start, I've made up a few basic templates and left them in Word so you can tweak them. I kept the formatting to a minimum so you can spiff them up as you like without having to undo a lot of formatting.


If you're not super computer savvy or you'd like a head start, I've made up a few basic templates and left them in Word so you can tweak them. I kept the formatting to a minimum so you can spiff them up as you like without having to undo a lot of formatting.


A few tips:
- The templates contain the following weekly configurations (but you can edit them since it is a word document):
- a 5 day week (Monday - Friday)
- a 3 day (Monday, Wednesday, Friday) week
- a 2 day week (Monday and Wednesday; as well as Tuesday and Thursday)
- The templates are set up so that if you add more rows that cause the template to run more than one page, the headings will follow.
- Also, be sure to mark off all your holidays and days off FIRST, then copy and paste each table to use as a template. I forgot to do that in the beginning and it was a headache as I had to shift things around when I went back and saw that I had forgotten to mark off a holiday/day off.
Download Pacing Guide Templates (Word Format)
So now that you’ve got one course planned and out the way continue making pacing guides for each additional class.
4. Put it all together
Once my pacing guides are done, I place them in each child’s binder my master binder.*

* I've changed things up a bit since I initially wrote this. I used to give my kids these pacing guides. Now, I keep them just for me--and here's why: I was flipping through the pacing guides to conference with my daughter, one day, and I realized it was probably annoying for her to have to flip through these in the course of a day (I was annoyed in just these few minutes). So I asked her if she thought it would be better to have all the assignments on 1 page for the week. She agreed, so we made changes. Now, I use my master pacing guides as just that, guides to see if we are on track and to prepare her weekly plans:
 Instead of just doing them weekly, I put a whole month (not all shown here) because I knew if I didn't get it out of the way for just more than one week, I'd fall behind (and I put reminders on Google Calendar to tell me when to spit out the next month's weekly plans for her).
Now back to the original post:
After the pacing guides are made up, I make up a weekly schedule printable for each of the kids that shows which days they have which classes and the times (you've got a head start on this if you filled out the weekly schedule form previously, now just add in the times or blocks). My kids keep this in their binders and I can post them on the wall for put them in my master binder for quick reference.

* I've changed things up a bit since I initially wrote this. I used to give my kids these pacing guides. Now, I keep them just for me--and here's why: I was flipping through the pacing guides to conference with my daughter, one day, and I realized it was probably annoying for her to have to flip through these in the course of a day (I was annoyed in just these few minutes). So I asked her if she thought it would be better to have all the assignments on 1 page for the week. She agreed, so we made changes. Now, I use my master pacing guides as just that, guides to see if we are on track and to prepare her weekly plans:

Now back to the original post:
After the pacing guides are made up, I make up a weekly schedule printable for each of the kids that shows which days they have which classes and the times (you've got a head start on this if you filled out the weekly schedule form previously, now just add in the times or blocks). My kids keep this in their binders and I can post them on the wall for put them in my master binder for quick reference.

My daughter is very much enamored with all things British right now, so I tried to incorporate some Britishy clip art to spiff up her schedule.
We already had our times/blocks worked out at this point, so I was able to make the schedule, but if we hadn't our next step would be to:
5. Schedule the Days

The next thing to tackle is your daily schedule and determine the times or sequence of classes for each day of the school week. I try to get input from my kids as to which subjects they would like to tackle first. Some homeschool veterans say that you should tackle the harder or more boring classes first and get them out of the way since, if they cause frustration or boredom, you may procrastinate and not get them done. (I'm still working on this as I tend to go for the easy classes first a great deal of the time, so we can do at least something).
Other things to take into consideration when making your daily schedule will be to consider who is independent and can work at their own pace, and who will need you to actually sit down with them to do the lessons. Some of my older kids work well with just attacking work in any order they choose (they just look at which classes they have for the day and consult their pacing guides for what is to be done). Others may be independent learners but still need some structure in their day, so for them, we plan out hour by hour or in specified blocks.
My biggest suggestion for scheduling your days is that you establish morning and evening routines and prayer times FIRST and then plan the school day (start/end times, sequence) around those guideposts. It does tend to confine your school time, but I try to remember that there's more to learning and homeschool life then just school time, we've got to develop hygiene and other life style habits as well!
*****
So that’s how I am currently planning my classes now. Planning is time consuming, for sure, but taking the time to do it in the beginning can really cut down on a lot of frustration later down the road. I also found that my daughter was a little stressed out when we were just winging it daily for the beginning of this year and she said it was so much better now that we had the pacing guides and I could tell in her demeanor as well that she felt more at ease, alhamdulillah. As I've read, kids thrive on routines and knowing what to expect next.
Another Update:
I had a few more thoughts that I wanted to share after initially writing this. The first consideration when lesson planning, should be that of mastery, not just to finish a textbook. In the home study program that we are in (and every other one that we've tried, K12, Connections, another local one), they consider finishing 80% of the curriculum as satisfactory or fulfilling their requirements. The most important thing is not to try to cram so many topics into the year that your child doesn't really understand most of it, or hasn't truly mastered it. In homeschooling, you have the beauty of going at your child's own pace. So, as many homeschool veterans have said, "don't be a slave to your curriculum."
And that's sound advice. I know I fall into this mistake over and over again and have to take a step back and reassess things. Planning is needed, to be sure, but you also have to have learn to be ok with being flexible, when it is warranted. Get your plan for the year together, so you have some goals and direction to work with, but be willing to relax things up and go slower along the course if you need to. With homeschooling, you have the whole year (and the next and the next...) to get that learning in. If you can't finish a textbook in one year, so be it, as long as you are progressing. As I've found some kids are able to get through the material in the full year, some aren't. Be sure to plan so you can have a course for each child, but work at each child's pace in each subject.
If you need any additional help or clarification on anything, feel free to contact me using the Contact TJ button at the top of any page, or contacting me via Facebook or Twitter!


